Sunday, April 6, 2014

Front Yard Pond

The previous owners of our house left us a pond in the front yard.  We completely ignored this pond for about two years.  Last week I decided to pull it out and get rid of it.  It was full of muck, and just gross.  I began to miss it a few days later and decided to put it back in.  Tami was gone for the week, and I thought i'd surprise her with a little oasis in our front yard.

Originally the pond sat up a little high in the ground, so the first thing I did was to dig the hole a little deeper so that it would set deeper into the lawn.  By the time I got it all leveled out , it ended up being higher than I wanted, but I decided to roll with it and see how it turned out.  The next step was to pull out all of the grass and weeds in the area around the pond.


Photo from Home Depot web site


Once I got most of the grass pulled up, I started putting down the weed blocker lawn fabric.  I used the "Easy Gardener WeedBlock 3 ft. x 50 ft. Polypropylene landscape fabric" from Home Depot.  It runs $5 to $10 bucks for 50 feet.


I Stapled the fabric down with lawn and garden staples - Also from Home Depot.  They look like 5 inch metal U shapes:
Picture From Home Depot Website


I unrolled several feet of lawn fabric and stretched it flat.  Then every foot or two, just stuck a staple down through the fabric into the dirt to hold the fabric tight in place.  It goes pretty quickly once you get started.  This keeps the grass and weeds from growing back up through the mulch and stones I'm going to put down on top of the fabric.

Picture From Home Depot Website
Once I had the fabric all in place and looking pretty, it was time to put down some mulch.  I've been using the Brown Earthgro mulch from Home Depot.  It generally runs for $2 to $4 a bag.   Each bag will cover about 3 square feet.  I used 7 bags for this project.


While I was shopping for the stuff I needed for this project, I found the cutest little wood border. It's called "Greenes Fence 3ft. wooden half log edging."   It comes in 3 foot strips with little metal stakes attached to hold it into the ground.  It costs about 8 bucks for every 3 feet, so it's not cheap, but it looks super cute.  I couldn't resist it.  I was 6' shy of what I needed and had to go back for more later in the day.


I spread out the mulch over the weedblock fabric, and then I took three bags of Vigoro white marble chip stones, and I spread those tightly around the edge of the pond.  These look way too clean and pretty by themselves, so I just put a bed of them on the bottom.  I bought 4 bags of river rock to put on top of the white marble chips.  The bags of stones all run about $3.50.

In this picture you can see how the river rocks give it a more natural look.


The next step was to add in some much larger stones that I had laying round the yard from previous projects.

I really liked how the larger stones look here.  I tossed the hose into the pond and began to fill it up.  I went back to the Home Depot for more of that cute little wooden border and decided to pick up some flowers too.  I  planted some tulips around the edge of the fence to give it some color.  I can't wait to see how it looks when they bloom.  

That night I got online and looked for some type of pump / filter / fountain contraption to put into the pond.  I found an awesome little solar powered pump / fountain for $16 on ebay.  What a bargain! It seemed too good to be true.  Well... it was.  it barely pumped at all, and it was completely clogged and broken in 2 days. 

So ... I got on amazon.com and found this guy:
Picture from Amazon.com
It's a Pondmaster PMK 190.  You have to say pondmaster in a Randy "Macho-Man" Savage voice.  It pumps, filters, and has a little fountain attachment.  I'll have to check the filter once in a while, but it works like a champ so far.


I also added a little chlorine floaty.  I don't intend to put any fish into the pond, and I don't want stuff growing in it, so i'm going to keep some chlorine in it.  I've hidden the cord to the pump under the mulch, and I plugged it into the power that runs the lighting that is hidden behind the shrubs.  The pond is right outside our den, so we can hear the fountain running if we open the windows.  It's pretty relaxing.


Next season, we'll expand this to take up that whole section of lawn inside the walkway there.  This was a little test run.  We're really pleased with the results so far.  We spent about $120 at Home Depot, which included some new work gloves, and then another $60 at Amazon.com for the pump/filter/fountain.  The project took about 8 hours start to finish.

Tami wants to add some decorations to hide the floaty a little and give it an even more natural look.  We'll update with pictures when we do it.
Live Well...Live Norman
P

Sunday, April 29, 2012

The Pool Gravel Project

The Pool Gravel Project -


I was running the weed whacker a few weeks back, and I noticed the tall grass coming up around the edge of our pool.


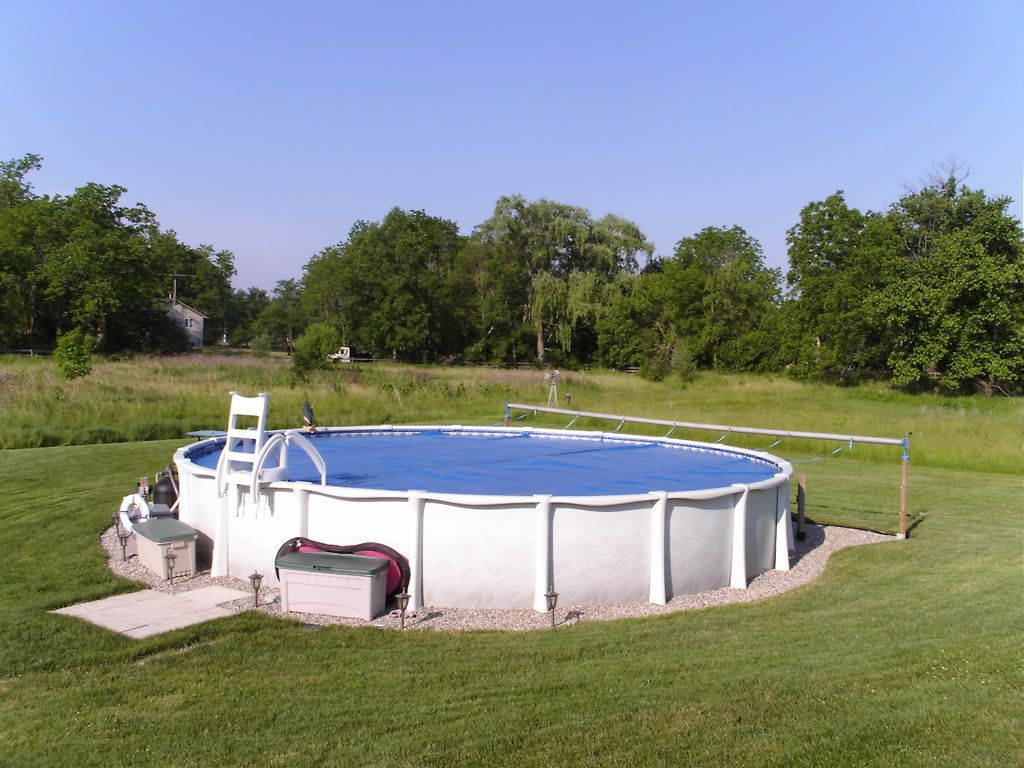
I may not have mentioned it before, but our new house came with a 24' pool.  Some day, we hope to actually get into this pool and swim... until then, we will continue to spend endless hours and dollars on making it pretty and clean.

I didn't really think that running a weed whacker against the side of the pool was a good idea.  We brainstormed a while, and by brainstorm, I mean we googled : "what do I do about tall grass around my above ground pool?"  Most people just said they spray roundup, but one guy said he had put some stones around his pool, and he had a picture of it.  It looked pretty nice.  We totally stole his idea. Here's a picture of what he did:


You can read about the discussion at troublefreepool discussion .

The first step was to get rid of the grass around the pool.  I got some grass and weed killer that was non-petroleum based and pet safe so that I could use it around the pool.  We sprayed a 1' ring around the entire pool, and let it work for about a week.  We used Spectracide.


The next step was to put a weed barrier around the whole pool.  This stuff comes in rolls.  It's a landscaping fabric that blocks weeds and grass from growing up below it.  You attach it to the ground with steaks or big staples that you hammer into the ground.  Here's a link to the stuff we got from Home Depot.  landscaping fabric


We put this down in a circle all around the pool.  Then on the outside edge of the circle, we also put down some edging that would keep the stones in and keep them from falling out into the rest of the lawn.  Here's the part where my amazing math skills come in to play.  Our pool is a 24 foot pool.  I bought enough of the edging to go 40'.  That's PLENTY!  We started putting it around the pool.


When a pool claims to be a 24' pool.  That number refers to the DIAMETER.  The number that I was interested in was actually the circumference.  The formula for the circumference of a circle is c = 2Pi * r.  The circumference of our pool is 2 * 3.14 * 12 = 75' (my 40' of edging was NOT plenty)  Having now figured out the true scale of our project, I realized we were not going to have enough gravel either... or for that matter, enough money to buy enough gravel until next payday.  :(  We went ahead and put together what we had for now though.  It looked so good!


We spent a few weeks with our pool being 1/3 surrounded with white gravel chips while we waited for our bank account to rebound from the $500 Home Depot spending spree we went on when we started this project.  (we also got a ceiling fan for the bedroom that I'll blog about next)  I don't actually recall how we squandered the rest of that money.


Today we spent another $100 on the rest of the materials for this project.  In total, it took 22 Bags of the white gravel chips.  Each bag will cover approximately 3 feet square in 2" of gravel according to the bag.  That ends up being fairly accurate.  Here are a couple of pictures of the finished job. We are really happy with how it turned out!


Live well... Live Norman.
P

Wednesday, April 18, 2012

Den Closet Shelves

After finishing all the painting in the den and the den closet, we decided to put up as much shelving as we could in the closet area. Here's the side of the closet where we wanted the shelves - freshly painted and pretty.


We went to Home Depot and looked around at what our options might be.  We decided on the Closetmaid wire shelf system - Closetmaid shelf system at home depot

We figured out that you can buy huge pieces of this stuff, and they will help you cut it down right there at the Home Depot -  It's a good deal cheaper than buying a bunch of smaller ones.


We needed several 3' pieces and several 4' pieces.  The staff at the Home Depot near our house is really awesome.  We almost always get fantastic service here.  I'm talking about the kind of service that you imagine little hardware shops gave customers in the 50's kind of good service. - so you'll have to pardon my occasional fawning over our local Home Depot.  This is totally the store all other Home Depots should aspire to emulate.  As with most things YMMV at your local store.  I forgot to mention all the help they gave us with picking out the proper paint and painting supplies in my previous post.  They went WAY above and beyond what I ever expect from big stores like this. OK, enough with the pants peeing over the HD.

So we bought a pile of 3 and 4 foot shelf pieces.  We also had to buy all the hardware to put them up.  Here's  what we got:
and 4 90 degree shelf brackets


So, we got the new shelves home and started putting them up.  You can see the little supports under the shelf and the brackets on the front ends.  You have to make sure that you cut your shelves short enough to fit down into these little low profile front support brackets.


We put the 4' pieces along the back wall.  It took some measuring, and a level to get the lines on the wall where each shelf should go.  I drilled pilot holes into the studs in the wall.  Each shelf as 3 brace bars that attach to studs.  There are also tiny bracket along the back of the shelf that sink into the studs and drywall.  You can just about sit on these shelves they're so sturdy.  The brace bars come with drywall anchors, but I chose to sink them into studs wherever possible.

Some of the pieces were a quarter inch or so too long, so I had to cut them down.  I have a tiny stanley tension saw kind of like this one here:

The saw cut through the shelves pretty easily.  I took the shelves I needed to cut out onto the back porch and rested them on the stairs.  I let the end of the shelf hang just a bit over end of the stairs and sawed right through in about a minute.  It wasn't exactly like a hot knife through butter, but it wasn't too bad.


I Got a couple of the 4' pieces up, and then put up a couple of the 3' pieces.


I used a corner connector piece to add the side shelves at a 90 degree angle


Here's a pic of the shelves all packed to the gills with our stuff ... and things:


We have a TON of storage space in this closet now, and this is just half of the closet. The other half of the closet has the rack for the home audio system we put in, and another bit of shelving.  We'll be adding a coat hook system of some kind soon.

I'm not sure I would choose this type of shelving if I were to do this over again.  It was a good bit of work to put them up, and they're not going to win any beauty contests. The support bars that come down can get in the way. They are very functional though, if a bit industrial.  They make a similar system to this, but it uses rails. I thought these shelves would be sturdier than the rail style, but after putting them up, I think either style is probably just as sturdy.

We also recently redid the laundry / storage closet off of the dining room and made it into a pantry with a different shelving system that I like even more.  I'll post about that one soon.

Live well - Live Norman
P

Sunday, April 1, 2012

The Den Part 1

Once we got the keys to our new home, we decided that before we get all our stuff moved into the house, we might try taking a popcorn ceiling down.  We had 3 days.  NO PROBLEM!  -  mostly.  Ever wonder how to take a popcorn ceiling down?  It's really not all that hard, at least that's what it looks like from all the videos I watched on youtube before starting this little adventure.   I later learned that it's similar to a trip through the 7 levels of Hell.  Here's a picture of the ceiling as it was before we began.


Perhaps you noticed the symbol on the wall?  yup, this one -


I'm not totally sure what the symbol stands for, but i'm pretty sure it's Japanese for: "I'm drawn in sharpie, so you better buy a couple gallons of Killz Stain covering paint, cuz this is gonna take 3 or 4 coats to get rid of me. (but when you say this you have to move your mouth out of sync with what you are saying to make it look like you being dubbed in english)"  In any case, whatever it stands for, We didn't really want it on our Den wall.  Next stop - Home Depot.


We bought a Spray can of Killz, two gallons of flat white ceiling paint, a quart of high gloss trim paint, two gallons of "Mysterious Mauve" semi gloss wall paint, one shop vac, two breathing masks, two paint rollers, two trim brushes, a spray bottle, a ladder, a scraper, a roll of contractor's paper, a bucket-o-putty, and several super cheap sheets of thin plastic painter's tarps.

When we got home we put most of it into the Den closet - 


First we put the contractor's paper down in strips along the floor until it covered the whole room:


Then we covered that with the thin plastic tarps.  


What we didn't do, and what you WILL do, if you ever do this, because you can now learn from our mistake is to make sure you put a plastic tarp over any doors that leave from this room into any other room of the house.  We still find dust from this project in the far reaches of our house months later.  Close this room off from the rest of your house like a Dexter kill room

Then I took the spray bottle and filled it with warmish water.  I sprayed it onto the ceiling and let it sit for 15 minutes or so.  When we do this again in the rest of the house, I will use one of those pump up yard sprayers. My hand still has nightmares of how cramped it got from squeezing that spray bottle 15 billion times. After the popcorn gets damp and sits for a bit, it scrapes off pretty easily.


I realized pretty soon, that we needed to take down the ceiling fan blades and cover the fixtures in plastic:


Where the scraping gets difficult is anywhere the ceiling is uneven or in spots where there is lots of mud under the popcorn.  The thing is though, as you can see from this picture, there's mud under MOST of the popcorn!


So yay! The popcorn is all down! Hard part over!  That's exactly what we thought.  Here's the truth though.  That was all easy compared to what came next.  No one tells you about this part.  I think it's because, most people go ahead and put some other texture on the ceiling.  We just got done taking all that ugly texture off the ceiling though, and we wanted a smooth perfectly flat ceiling.  The part that no one else seemed to mention on all the web sites I looked at and all the youtube videos I watched is that now you have to sand the whole ceiling down.  As I mentioned earlier, we bought sanding pads and put on these sticks:


Twenty minutes later, we had sanded about 3 square inches of the ceiling properly and were about ready to sell the house and move back to our apartment.  Do not bother with the sanding pad on a stick.  The sanding pad on a stick will make you cry, and consider drinking paint.

Back to Home Depot.


We are now the proud owners of a fine little device called a 1/4' sheet sander:

I stood on a ladder with this little guy over my head and sanded the whole ceiling until the sun went down. It only weighs 3 lbs, but after several hours, it feels like it weighs 1,000 lbs.  Here's the ceiling after I got it all sanded down:


Here's the floor:


Here's me:


To say this job is messy is obviously an understatement.  Remember the advice I gave you earlier about closing this room off from the rest of the house - Believe it!  We had the windows open, and a fan blowing out the screen door, and it looked like the dry wall apocalypse in the Den.

Next, we got to use our new handy dandy shop vac.  Tami loves this.  It instantly became her new favorite toy:

before the sanding dust settled

the next day after the dust settled

After we let the dust settle over night, it was time to paint.  I think when you paint you are supposed to start at the top and work your way down.  That's what we did, so hopefully we did it right. I've never actually really done this before, but I come from a long line of professional painters, so I went on instinct here.

We put our sticks to work here.  We removed those lame sanding pads from the extend-o-sticks and attached the rollers.  The sticks work really well for this purpose, and I highly recommend them for this.


Two coats on the ceiling of flat white, and it looks AWESOME!  I'm really proud of how well this turned out.  We also started out working on the Japanese symbol for indelible ink on the wall.  Two coats of Killz on it were not enough.  It ended up taking 4 coats I think.  We taped the ceiling off and called it a night.


We still haven't resolved this issue though:  The previous owners painted all over the Den door window:


I imagine we can fix this with a razor blade, but I haven't attempted it yet.  That'll be another blog post in itself most likely.  By the end of day two we had the ceiling done, and the symbol all killzd.  On day three we painted the walls, waited several hours, and then taped off the trim and painted the trim.  Here's another place you can learn from our mistakes.  I don't think there's any real good reason to tape if you are careful when you paint.  

If you do tape, make sure you wait over night for the paint to really fully dry before taping over it, and then remove it   the minute you are done with it.  We put the tape on too soon, and then left it on for a couple days before pulling it off.  It totally pulled paint off and we had to do a whole bunch of touch up painting after pulling the tape off.  Here's a pic of the final product.  We totally love it!  


The next project in this room is going to be crown molding.  That should be fun :)  Hehe, I just noticed Mia is in this picture.  cute!
Live Well...Live Norman
P